Introduction
The lower back rehabilitation class aims to help you recover from your back injury injury or surgery and to show you how to get your joint movement, muscle power, flexibility and balance back. We want to support you to achieve your goals and return to your normal levels of activity. Having looked at the difficulties and / or pain you are experiencing, we are offering you this as the best and quickest way to make a full recovery.
What to expect
This is a physical, progressive exercise rehabilitation group. The group usually consists of up to 12 people, who are at varying stages of recovery for a variety of problems. The therapist will confirm some details with you at the start of the class and provide you with information on what to expect. You will be monitored and guided through the exercises and with time you will become familiar and more confident. We would like you to attend 4 regular sessions and it is important to practice these exercises at home in between sessions and once your treatment has finished.
What will I need?
- Wear loose fitting clothing that is comfortable to move in
- Wear supportive footwear such as trainers
- You may wish to bring a drink
Read our FAQs for more information about our classes and what to expect.
Self-help exercises
Try to find 5-10 minutes in your daily routine to complete some of these exercises, choosing 3-4 different ones each time to practice.
To make progress with your recovery, each exercise should be easy and comfortable at the start but slightly uncomfortable by the end, with the discomfort easing within 10 minutes of finishing.
If it is too hard (very uncomfortable or doesn’t ease off) do less repetitions or the easier version next time. If it is too easy (doesn’t get uncomfortable by the end) do more repetitions or the harder version of the exercise next time. The exercises provided are a guide and not all of them may be appropriate for you. Speak to your therapist for specific guidance on your home program or if you have any concerns with any of the exercises.
Exercise 1

Lie on your back with your knees bent and your feet on the floor (crook lying). Place your arms out to the side for stability. Slowly lower your legs to one side until you feel a gentle stretch. Return to the central position and repeat. Keep your knees together during the movement.
+ To make this harder take your left arm over to the right side as your knees go to the left, and right arm to the left as your knees go to the right to increase the stretch.
– To make this easier, starting with your knees in the middle, just rock your knees very gently side to side.
Exercise 2
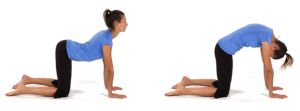
Start on all fours with your back straight, hands under the shoulders and knees under the hips.
To do the dog stretch, slowly inhale and let the belly fall toward the floor to arch the back and extend the head at the same time; hold for a count of 3.
To do the cat stretch, slowly exhale, round the back and tuck the chin to the chest; hold for a count of 3.
Alternate between these two positions slowly.
+ To make this harder push into the stretch and hold for 5 in both directions.
– To make this easier move your back gently up and down, whilst your head moves gently in the opposite direction from the all fours position (as your back goes down your head comes up, as your back comes up your head drops down).
Exercise 3
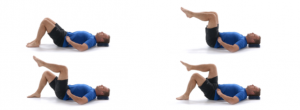
Lie on your back with your knees bent and your back in neutral position (slightly arched).
Make yourself steady by gently squeezing the muscles you would use to stop yourself weeing, and the lowest part of your tummy muscles, without holding your breath.
Maintain normal breathing while you lift one thigh until the knee points towards the ceiling.
Keeping those pelvis and tummy muscles switched on gently, raise the other thigh until the knee points towards the ceiling.
Lower the first foot on the ground, then the second.
Alternate the starting side.
+ To make this harder, from the point where you have both knees pointing to the ceiling, stretch one leg out straight, lowering it to halfway between being on the floor and pointing to the ceiling, then bring back to it’s bent position. Do the same with the other leg; then lower both to the ground one at a time as before.
– To make this easier just lift the legs one at a time and put them back down to the floor so that you don’t have them both up at once.
Exercise 4
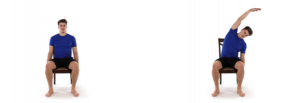
Sit up straight in a chair and look directly ahead of you.
Lift one arm up and above your head and slowly bend sideways while reaching down with the opposite hand, until you feel a stretch at the side of your trunk.
Relax and come back to the middle. Repeat to the other side.
When you bend your trunk sideways, do not twist or lean forward. Keep your body straight and facing forward.
+ To make this harder start in a standing position, lift your arm and bend sideways, reaching down with the opposite hand until you feel a stretch. Come back to the middle and repeat to the other side.
– To make this easier, in sitting, put both hands on your shoulders and slowly bend sideways without twisting or leaning forwards. Come back to the middle and repeat the other side.
Exercise 5
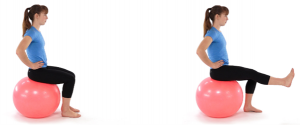
Sit on a ball with your thighs parallel to the ground, your feet flat on the floor and your back in a neutral position (slightly arched).
Make yourself steady by gently squeezing the muscles you would use to stop yourself weeing, and the lowest part of your tummy muscles, without holding your breath.
Maintain normal breathing while you straighten one leg until you feel a gentle stretch keeping your back and pelvis completely still.
The ball should not move during the exercise. Lower your leg and repeat with the other leg.
NOTE – if you are doing this at home without a physio ball perch on the edge of your mattress on your bed, and do the same movements.
+ To make this harder raise both arms as you raise each leg, hold for a count of 3.
– To make this easier steady yourself in the same position as above, but just take one foot off the ground at a time, without straightening the knee.
Exercise 6
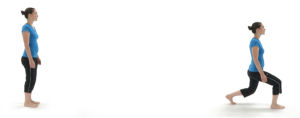
Stand and step forward keeping your trunk vertical.
Bend the front leg, keeping your knee cap in line with the 2nd toe and pelvis level, don’t bend at waist.
Push back up to the starting position.
+ To make this harder step out further, bringing the opposite hand forward in front of you at the same time
– To make this easier reduce the size of your step
Exercise 7
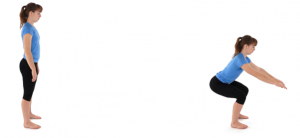
Stand with both feet slightly wider apart than usual and facing forward.
Slowly lower your body into a squat position while keeping your back straight and your knees going forwards over your toes. Lean slightly forward just like you were sitting in a chair, keeping your heels on the ground.
Push through your heels and activate the muscles in your bottom to come back to standing.
Repeat.
+ To make it harder squat deeper, bending your knees more
– To make it easier do a shallower squat, as if you only got half way to the imaginary ‘chair’
Exercise 8
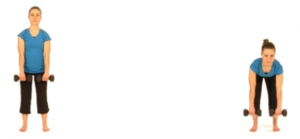
Stand with your arms on each side, holding a weight in each hand and your knees slightly bent.
Keeping your back straight and your bottom pushed back, bend forward from your hips until you feel a gentle stretch behind your legs.
Return to the standing position using the muscles in the back of your legs and your bottom.
Keep your back straight, chin in and shoulders back throughout.
NOTE – at home you could use tins of food or small drink bottles to act as weights
+ To make it harder when you are upright lift the weights first to your shoulders, then above your head. If you are doing this make sure the weights stay in front of you and you don’t lift them behind you or arch your back.
– To make it easier do the same movement but without the weights
Physical activity reduces the chances of major illness
The importance of being active
NHS guidleines recommend the following:
- 150mins moderate intensity exercise a week
- 30mins x 5 = Weekly recommended activity
- Moderate intensity = any exercise that elevates the heart/ breathing rate to a point where you can still hold a conversation 75mins of intense exercise a week
- 15mins x 5 = Weekly recommended activity
- Intense exercise = any exercise that elevates heart rate
Physical benefits include
- Energy levels increased
- Increased physical strength
- Completing longer walks
- Grants you some more ability to do more things that you may enjoy Decreases chance of developing OA by 83%
Mental benefits include
- Stimulates Release of dopamine and serotonin
- Improving mood
- Reduces Stress
- Improves sleep – Serotonin has been shown to be assistive with sleep regulation
- Better digestion – Lower Serotonin presence in the gut is found to correlate with constipation
- Health is a state of complete physical, mental and social well-being and not merely the absence of disease or infirmity”. WHO
Vita is an award-winning, CQC registered healthcare provider


